GenAI in Coding
Guide written by Ken Reid & Jing Liu, compiled in part from the “Code Smarter, Not Harder: Harnessing Generative AI for Research Programming Efficiency” tutorial by Sindhu Kutty.
This guide helps researchers leverage generative AI coding assistants to improve their programming workflow.
Part One focuses on using ChatGPT, a web-based AI assistant, to learn and explore coding concepts. This is ideal for those new to programming.
Part Two guides users to install GitHub Copilot into JetBrains Integrated Development Environment (IDE) ‘DataSpell’. Copilot is an AI-driven tool that integrates with popular IDEs, providing context-aware code suggestions and completions. . Once installed, the guidance from Part One applies to GitHub Copilot as well.
Part Three delves into the additional features in GitHub Copilot, such as code translation, test case generation, and documentation creation, which further enhance developer productivity and code quality.
Part One: Exploring Coding with ChatGPT
1. Click here to open ChatGPT in your web browser. Either sign up or log in, then start a new chat:

2. Consider which programming language you wish to explore – or even ask ChatGPT:

3. Conduct and plot specific analysis

1. Ask for assistance in understanding complex code:

2. Have ChatGPT explain concepts, functions or best practices:

3. You can use ChatGPT to help solve errors and debug your code:

1. ChatGPT can help with specific libraries like pandas, matplotlib, or ggplot2.

2. ChatGPT can help with Git and other similar version control:

3. Having specific problems to solve can help you learn the language, ChatGPT can offer project ideas:

Part Two: Installing GitHub Copilot in Your IDE
Integrated Development Environments (IDEs) should be selected based on what programming languages they support. For example, the Jetbrains IDE DataSpell is a common choice for people interested in data analysis with Python.
- Install JetBrains DataSpell
- Download the GitHub copilot plugin and enable the GenAI coding assistant within your IDE. This depends on your selected IDE and assistant, example instructions of how to do this for GitHub Copilot and the various supported IDEs can be found here.
- GitHub provides a guide on how to install GitHub copilot for various IDEs here
- Launch your IDE and begin a new project. Insert a “Hello World” snippet from here for your preferred programming language (we will assume Python for the rest of this guide).
- If you type in a comment, you will see something like below (in this example, the comment is line 1, then line 2 is the suggested code by the AI assistant), then you will know that your AI assistant is working!

Part Three: Additional Features of GitHub Copilot
Integrated Development Environments (IDEs) should be selected based on what programming languages they support. For example, the Jetbrains IDE DataSpell is a common choice for people interested in data analysis with Python.
1. Code Completion: As you type, GitHub Copilot suggests code completions based on the context of your code and its knowledge base.

2. Function Generation: Provide a function name and docstring, and GitHub Copilot can generate the entire function body for you.

3. Code Explanations: Ask GitHub Copilot to explain a piece of code, and it will provide a detailed explanation of what the code does, relevant to the context of your open project.
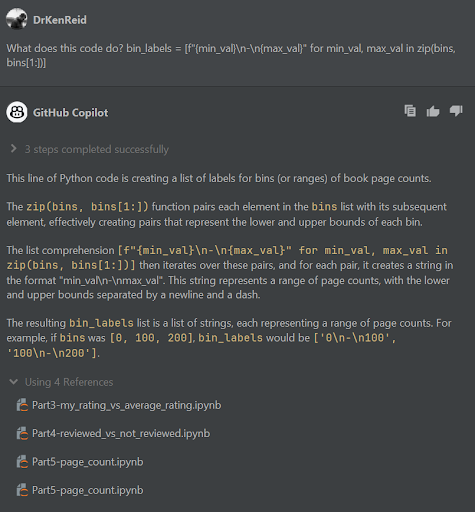
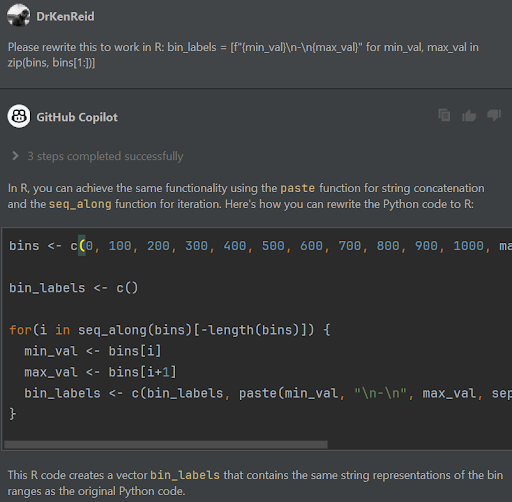
4. Code Translation: Paste code written in one programming language and ask GitHub Copilot to translate it to another language.
5. Test Case Generation: Request GitHub Copilot to generate test cases for a specific function or class to ensure code reliability.
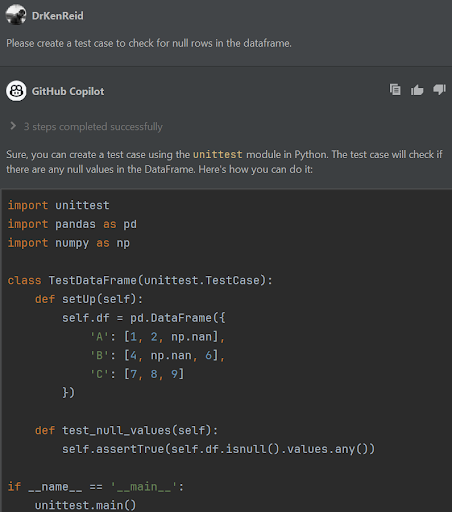
6. Test Case Generation: Request GitHub Copilot to generate test cases for a specific function or class to ensure code reliability.
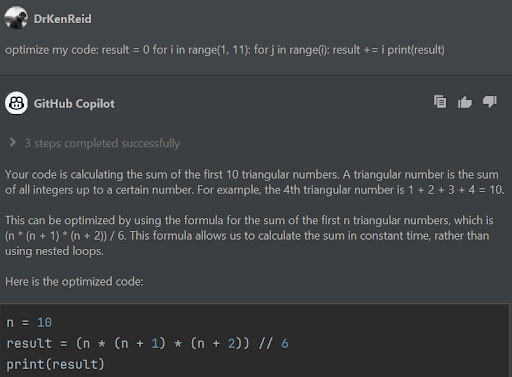
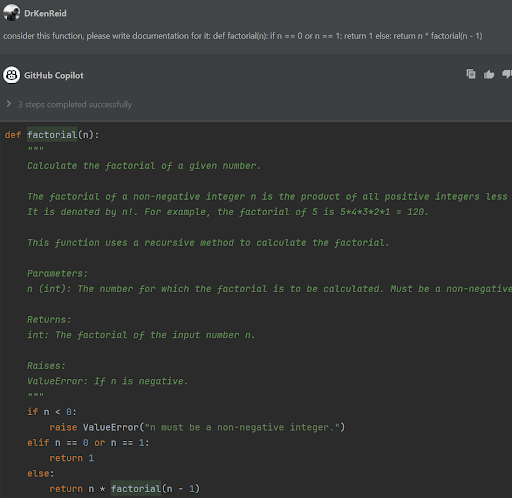
7. Documentation Generation: Prompt GitHub Copilot to generate documentation for your code, including function descriptions and usage examples.
Tips for Prompting
- Be clear and specific about the task you want the AI assistant to help with.
- Provide context and examples when necessary to guide the AI assistant.
- Break down complex tasks into smaller, manageable steps.
- Iterate on your prompts based on the AI assistant’s responses to refine the generated code.
Additional Resources
- Quick guide for using “Data Analysis” in ChatGPT 4.0 for programming examples
- Tutorial: “Code Smarter, Not Harder: Harnessing Generative AI for Research Programming Efficiency”
- Resource hub for examples of generative AI used in research and more resources